Wedding glow planning requires matching facials and aesthetic procedures to realistic recovery windows. This article guides brides and grooms through safe timing and aftercare for Botox, fillers, laser facials, chemical peels, microneedling, and non‑surgical body sculpting. Learn evidence‑based timelines, risk reduction steps, contingency plans for complications, and a practical checklist so you look your best and confident on the big day.
Planning Your Bridal Skin Timeline
Timing is the single most critical factor in bridal aesthetics. It isn’t just about when you book the appointment; it is about how much time you give your body to react, heal, and remodel collagen. A rushed timeline increases the risk of visible side effects like redness, peeling, or bruising appearing in your wedding photos.
View this process backward. Your wedding day is the finish line. You want to arrive there with skin that is calm and stable. High-reward treatments often carry higher risks and longer downtime. That is why we schedule aggressive procedures—like CO2 lasers or deep chemical peels—months in advance. This buffer allows for a full recovery and lets us handle any unexpected reactions without panic.
The Conservative Countdown: A General Rule of Thumb
View your timeline as a funnel. You start wide with major changes and narrow down to gentle maintenance as the date approaches.
6+ Months Out: The Heavy Lifting
This is the window for structural changes and skin resurfacing. If you plan on using ablative lasers, deep peels, or starting a course of isotretinoin (Accutane), do it now. The American Academy of Dermatology (AAD) and current clinical guidelines emphasize that skin barrier function can take months to fully normalize after deep resurfacing. This is also the time to test neuromodulators (like Botox) if you have never had them, to ensure you like the results.
3 Months Out: The Refinement Phase
Major swelling from earlier procedures should be gone. Now you focus on collagen stimulation like microneedling or non-ablative lasers (like Moxie or Fraxel). If you are doing fillers, this is generally the safest cutoff for the final syringe to ensure everything settles and integrates with your tissue.
4–6 Weeks Out: The Glow Maintenance
Stop experimenting. Stick to facials you have tried before. Gentle chemical peels (superficial depth) or Hydrafacials fit well here.
2–3 Weeks Out: The Safety Zone
No needles. No lasers. The risk of a bruise taking two weeks to fade is too high. Stick to hydration and barrier support.
1 Week Out: Hydration Only
Gentle oxygen facials or LED light therapy. Nothing that causes peeling.
48–72 Hours Out: Hands Off
Avoid touching the face. Focus on sleep and water. If you have a sudden breakout, see your dermatologist for a cortisone shot rather than picking at it.
Medical Prep and Baseline Assessment
Before booking a single appointment, you need a baseline assessment with a board-certified dermatologist or a qualified aesthetic injector. This isn’t just a sales consultation; it is a medical review.
Medication and Supplement Review
Your provider needs to know everything you ingest. If you have taken oral isotretinoin, standard safety protocols typically require a 6-month wait before performing laser treatments, dermabrasion, or deep peels to prevent scarring, according to FDA warnings and ASPS safety data.
Managing Blood Thinners
Bruising is the enemy of a bridal timeline. Many common supplements act as anticoagulants. You should discuss pausing fish oil, vitamin E, gingko biloba, garlic supplements, and turmeric 7 to 10 days before any injectable or microneedling treatment. Aspirin and NSAIDs (ibuprofen) also increase bleeding risk. Always clear this with your prescribing physician if you take blood thinners for medical reasons.
Topical Retinoids and Exfoliants
Retin-A, retinol, and glycolic acids thin the stratum corneum (the outer layer of skin). This makes laser and peel penetration unpredictable. Most protocols require stopping these 3 to 7 days before treatment. Restarting them too soon can cause burns.
Pregnancy and Breastfeeding
If you are pregnant or breastfeeding, your options change. Retinoids, high-strength salicylic acid, and most injectables (Botox and fillers) are off the table due to a lack of safety data for the fetus. Stick to lactic acid peels, azelaic acid, and physical exfoliation.
Layering Treatments Correctly
You cannot do everything at once. Treatments need to be sequenced to prevent inflammation stacking.
Lasers and Injectables
The general rule is energy first, volume second. Schedule your laser resurfacing or radiofrequency treatments first. Heat can theoretically degrade hyaluronic acid fillers or cause them to migrate if the filler hasn’t settled. Wait at least 2 to 4 weeks after laser treatment before getting fillers or Botox.
Peels and Facials
Do not book a facial the same week as a chemical peel. A facial involves massage and steam, which can over-stimulate skin that is trying to shed. Space these at least two weeks apart.
Sample Schedules for Every Bride
Here are concrete examples of how to structure your appointments based on how much time you have left.
| Timeline | Focus | Key Appointments |
|---|---|---|
| 12 Months | Complete Overhaul | Month 1-3: Accutane (if needed) or CO2 Laser. Month 6: First round of Botox/Filler trial. Month 9: Microneedling series starts. |
| 6 Months | Standard Prep | Month 1: Consultation + Start Retinoids. Month 2-4: Series of 3 non-ablative lasers or peels. Month 5: Final Botox/Filler top-up. |
| 3 Months | Refine & Glow | Week 1: Light laser (IPL) or superficial peel. Week 4: Botox (final round). Week 8: Hydrafacial. Week 11: Dermaplaning. |
| 6 Weeks | Damage Control | Week 1: Gentle enzyme peel (no shedding). Week 3: Hydrating facial. Week 5: LED Therapy. Note: No needles or lasers allowed. |
For a broader look at how these fit into your overall planning, you can check A Wedding Beauty Timeline to Help You Feel Your Most Confident, which aligns well with these dermatological milestones.
The Pros and Cons of Maintenance Near the Date
It is tempting to squeeze in “one last treatment” for extra glow. This is often a mistake.
Pros of Late Treatments
Gentle treatments like dermaplaning (shaving off peach fuzz) 10 days before the wedding can make makeup application smoother. LED light therapy 3 days before can reduce inflammation and redness without contact.
Cons of Late Treatments
Stress affects healing. Your cortisol levels are high the week before the wedding. This can slow down recovery from even minor extractions, leading to lingering redness. A “maintenance” chemical peel can react unpredictably if your skin is dehydrated from travel or stress, leading to sheeting skin on the big day.
Contingency Planning and Legal Steps
Even with perfect planning, biology is unpredictable. You need a reserve plan.
The Bruise Buffer
Always schedule injectables at least 3 to 4 weeks before any major photo event (bridal shower, bachelorette, wedding). If you bruise, you need time for the hemosiderin (the yellow/brown stain) to clear. Have a plan to access a vascular laser (like V-Beam) if a major bruise appears; it can speed up healing if treated within 48 hours.
Informed Consent and Documentation
Legitimate providers will require detailed informed consent forms. These documents outline risks like necrosis, blindness (rare for fillers), and hyperpigmentation. Read them. They also require “before” photos. These are not just for social media; they are part of your medical record to track baseline asymmetry. If a provider skips photos or consent forms, leave immediately.
Patch Testing
If you have sensitive skin or a history of contact dermatitis, request a patch test for any new chemical peel or numbing cream. Apply a small amount behind the ear 48 hours before the full treatment. This simple step can save you from a full-face allergic reaction.
By sticking to a rigid, conservative timeline, you move from “fixing” problems to “maintaining” results. The goal is to wake up on your wedding day looking like yourself, just well-rested and luminous, not recovering from a procedure.
Treatment Specific Timing and Aftercare
You have your timeline planned, but executing the actual treatments requires precision. The difference between a radiant complexion and a stress-induced breakout often comes down to specific aftercare and knowing exactly when to stop active ingredients. We are looking at the recovery protocols for the most common pre-wedding procedures based on current clinical standards.
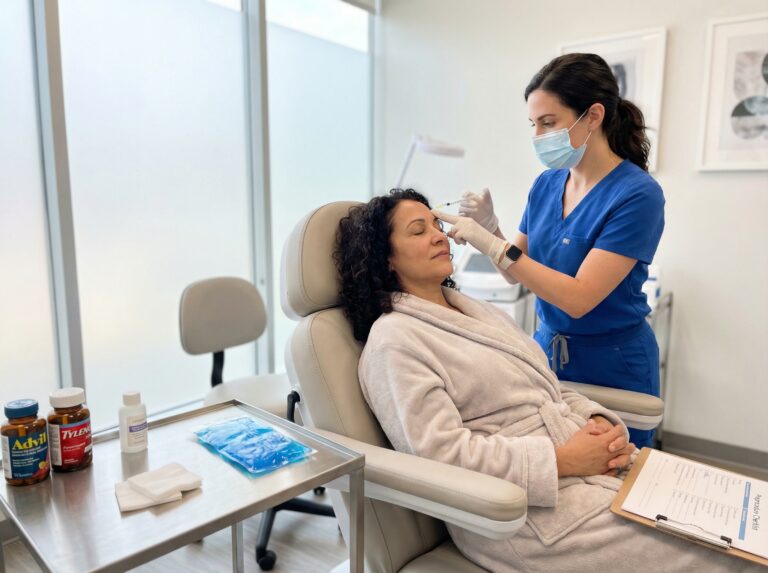
Neuromodulators (Botox, Dysport, Daxxify, Jeuveau)
Mechanism and Timing
These injectables temporarily block nerve signals to muscles, softening dynamic wrinkles like crow’s feet or frown lines. While marketing often promises quick results, full efficacy takes 14 days. The ideal window for a bride is 4 to 6 weeks before the wedding. This allows two weeks for the product to settle and another two weeks for any necessary touch-ups. Do not try this for the first time less than a month out; if you have an adverse reaction like ptosis (droopy eyelid), you need time for it to wear off.
Immediate Side Effects and Aftercare
You might see small red bumps at injection sites, which usually vanish within 30 minutes. A mild headache is common. To prevent migration of the toxin, stay upright for four hours post-injection. Avoid heavy exercise for 24 hours, as increased blood flow can metabolize the product unevenly or increase bruising risk. Skip facials or face-down massages for at least two weeks after injection to avoid physically moving the product.
Makeup and Photography
You can apply mineral makeup gently after 4 hours, but waiting until the next day is safer to keep injection sites sterile. If you get a small bruise, it usually appears yellow or green by day three. A peach or orange color corrector will neutralize these tones under concealer for photos.
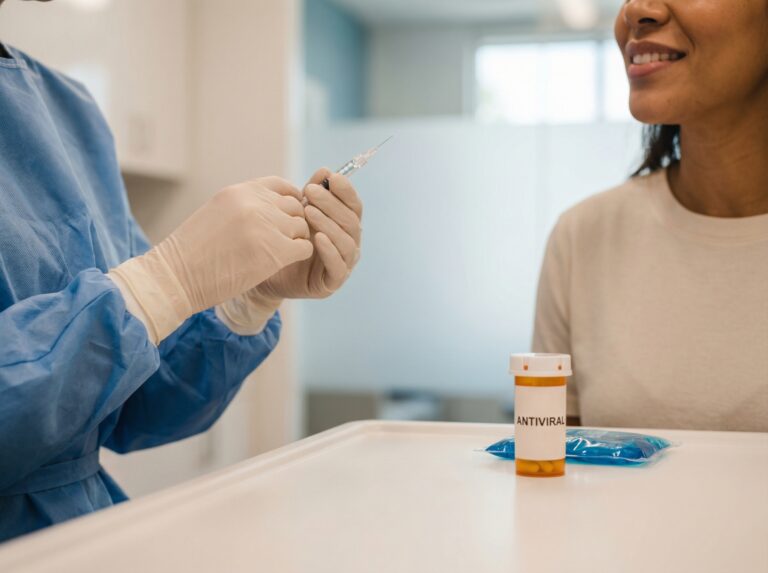
Dermal Fillers (Lips, Cheeks, Jawline)
Mechanism and Timing
Fillers restore volume using substances like hyaluronic acid (HA). Unlike Botox, the result is immediate, but the “final” look takes time. HA is hydrophilic, meaning it pulls in water. You will be swollen. Schedule fillers at least 2 to 3 months before the wedding. This ensures the product integrates with your tissue and any residual swelling—which can look asymmetrical initially—fully subsides.
Aftercare and Complications
Bruising and swelling are expected. Apply cold compresses (10 minutes on, 10 minutes off) for the first 24 hours. Avoid alcohol, aspirin, and Vitamin E for 3 days prior and 2 days post-treatment to minimize bleeding. If you are prone to cold sores, discuss prophylactic antivirals with your doctor, as needle trauma can trigger an outbreak.
Urgent Warning: If you experience severe pain, skin blanching (turning white), or a mottled pattern on the skin, call your injector immediately. These are signs of vascular occlusion, a medical emergency that requires dissolving the filler instantly to save the skin tissue.
Makeup and Photography
Wait 24 hours before applying makeup to avoid introducing bacteria into the injection points. Fillers can sometimes cause the “Tyndall effect,” a bluish tint under the skin in photos if placed too superficially. This is difficult to cover with makeup, which is why the 3-month buffer is critical for correction if needed.
Non-Ablative Lasers and Light Therapies (IPL, Fraxel Dual, Clear + Brilliant)
Mechanism and Timing
These devices heat the underlying skin tissue to stimulate collagen without destroying the surface layer. They treat pigmentation, redness, and fine lines. Recovery is generally 3 to 14 days depending on intensity. Schedule your final session 4 weeks before the wedding. This ensures any “bronzing” (where pigment darkens before flaking off) has completely resolved.
Aftercare and Expectations
Your skin will feel like a sunburn for 24-48 hours. Pigment spots will darken and look like coffee grounds before sloughing off. Do not pick them. Strict sun avoidance is mandatory; UV exposure during healing can cause hyperpigmentation. Use a broad-spectrum physical sunscreen (zinc or titanium) of SPF 30+ daily. Avoid retinoids and exfoliating acids for 7 days pre- and post-treatment.
Makeup and Photography
You can usually wear makeup the next day. However, the texture of your skin might be rough (like sandpaper) for a week, which high-definition cameras will pick up. Avoid heavy matte foundations during this peeling phase; tinted moisturizers are more forgiving.
Ablative Lasers (CO2, Erbium)
Mechanism and Timing
These vaporize the outer layers of skin for deep resurfacing. The results are dramatic, but the recovery is significant. This is a “6 months out” procedure. Redness (erythema) can persist for months after the initial wound healing.
Aftercare and Complications
You will have open wounds initially. Follow your provider’s instructions on vinegar soaks and occlusive ointments (like Aquaphor) to prevent infection. You cannot be in the sun at all. Signs of complication include yellow crusting, increasing pain, or fever, indicating infection.
Ideally, a consistent facial regimen should commence at least six months before the wedding to handle these deeper treatments safely.
Makeup and Photography
You cannot wear makeup until the skin has re-epithelialized (closed up), usually 10-14 days. Even then, you will likely need green-tinted primer to counteract the persistent pinkness that lasts for weeks.
Chemical Peels
Classifications and Timing
Superficial Peels (AHAs, BHAs): Exfoliate the top layer. minimal downtime. Safe 2-3 weeks before the wedding.
Medium Depth (TCA): Reach the upper dermis. Expect significant peeling for 7-10 days. Schedule 3 months out.
Deep Peels (Phenol): Medical-grade resurfacing. Schedule 6+ months out.
Avoid scheduling any peel closer than 14 days to the wedding. Stress can slow healing, and you do not want to be shedding skin on your day.
Aftercare
The golden rule: do not pull the loose skin. Pulling causes scarring and hyperpigmentation. Keep the skin hydrated with simple, fragrance-free moisturizers. Avoid heat (saunas, hot yoga) which can induce inflammation.
Makeup and Photography
Makeup looks terrible on peeling skin. It catches on the flakes and highlights the texture. Wait until peeling has completely stopped before resuming full foundation.
Microneedling and PRP
Mechanism and Timing
Microneedling creates controlled micro-injuries to trigger collagen production. PRP (Platelet-Rich Plasma) boosts this healing. While skin looks glowing after a week, the remodeling takes 4-6 weeks. Schedule the last session 1 month prior.
Aftercare
You will look sunburned for 24-48 hours. Use only the products provided by your clinician (often hyaluronic acid) for the first day. Avoid sweat and gyms for 72 hours to prevent bacteria from entering the open channels. Resume your normal skincare only after sensitivity subsides.
Makeup and Photography
Wait at least 24 hours, preferably 48, before applying makeup. Your pores are open channels.
Hydrafacial and Microdermabrasion
Mechanism and Timing
These are exfoliation and hydration treatments. They are generally safe closer to the date. Schedule a pre-wedding facial about 6 to 8 weeks before the big day—like a hydrafacial or LED-enhanced session to test your reaction, then do the final one 10-14 days before the wedding. Avoid doing this 48 hours before the event if you have never had one, as purging can occur.
Aftercare
These have zero social downtime. Wear SPF. Avoid other exfoliants for 3 days.
Makeup and Photography
You can wear makeup immediately, but your skin will look so clean you might not want to. It provides an excellent smooth canvas for the wedding makeup artist.
Non-Surgical Body Sculpting (CoolSculpting, Emsculpt)
Mechanism and Timing
Cryolipolysis (CoolSculpting): Freezes fat cells. Results take 1-3 months to appear as the body metabolizes the dead cells. Schedule 4-6 months before the wedding.
Muscle Stimulation (Emsculpt): Builds muscle tone. Results appear faster, but a series is needed. Finish 1 month before.
Aftercare and Honeymoon Considerations
CoolSculpting often leaves the treated area numb, swollen, and bruised for weeks. You might experience “shark bites” (sharp nerve pains) as nerves regenerate. Wear loose clothing. Massage the area as instructed to break up fat cells.
If you are going on a beach honeymoon immediately, be aware that suction marks or square-shaped bruising from applicators can last 2-3 weeks. Plan accordingly with swimwear.
Frequently Asked Questions About Facials and Cosmetic Treatments Before the Wedding
It is normal to have a million questions running through your head as the date gets closer. You want to look perfect, but you are also terrified of waking up with a reaction three days before the ceremony. That fear is healthy. It keeps you from making impulsive decisions that could ruin your wedding photos.
The previous section covered the technical side of treatments, but real life is rarely that textbook. You have logistics to manage, timelines that slip, and unexpected skin tantrums. This section tackles the specific, practical questions that usually pop up during late-night panic scrolling. We are focusing on safety, realistic recovery windows, and damage control.
Can I get a Hydrafacial or microdermabrasion the day before the wedding?
Please do not do this. There is a common misconception that because these treatments are “non-invasive” or “no downtime,” they are safe to do 24 hours before an event. That is false. Even gentle suction and exfoliation can trigger a “purge,” where bacteria deep in the pores is brought to the surface, resulting in whiteheads a day or two later.
Mechanical exfoliation also stimulates blood flow. While a glow is nice, looking flushed or blotchy in your rehearsal dinner photos is not. You also risk minor scratches or sensitivity that could make your wedding day makeup sting or sit unevenly.
The Safe Timeline
Schedule your final exfoliation treatment 7 to 10 days before the wedding. This gives your skin ample time to calm down, and any purging will have cleared up. If you want a treatment closer to the date, stick to a gentle, hydrating LED light therapy session or a soothing oxygen facial 48 hours prior.
How soon after Botox can I safely get a facial?
You need to wait. If you get a facial too soon after neuromodulator injections (Botox, Dysport, Xeomin, Daxxify), the pressure and massage from the facialist’s hands can physically move the toxin into unintended muscles. This can lead to drooping eyelids or an uneven smile.
Wait Time Checklist
- Minimum wait: 24 to 48 hours for the injection sites to close and the product to bind.
- Ideal wait: 7 to 10 days. This ensures the toxin has settled completely and allows you to see if you need a touch-up before doing anything else to your face.
- Instruction for your aesthetician: Even after a week, tell them you had injections so they avoid aggressive massage in those specific areas.
How long after fillers will swelling and bruising resolve?
Hyaluronic acid fillers (lips, cheeks, chin) love water. They pull in moisture immediately, which causes swelling. You might look great leaving the chair, but the next morning you could look puffy or distorted. This is part of the process, not a botched job.
Bruising is also unpredictable. You might not bruise at all one time, and then have a dark purple hematoma the next.
Recovery Reality
Days 1–3: Peak swelling and potential bruising. Lips may look uneven or too big.
Days 4–7: Swelling subsides, bruises turn yellow or green.
Day 14: The product settles (“integrates”) into the tissue. This is when you see the real result.
The Rule: Never book fillers less than 4 to 6 weeks before the wedding. You need a buffer time for swelling to go down and for any necessary corrections (or dissolving) if things don’t look right.
Can I combine Botox and fillers in the months before my wedding?
Yes, this is often called a “liquid facelift” or full facial balancing. It is safe to do them in the same appointment. Providers usually inject the filler first, then the Botox.
However, doing both increases the trauma to the tissue. You will have more needle pokes, which means a higher risk of bruising. If you are doing a combination treatment, push your timeline back. Do not attempt this 3 weeks out. Aim for the 2 to 3-month mark. This gives the Botox time to kick in (2 weeks) and the filler time to settle (2-4 weeks), leaving you plenty of time for a touch-up if the balance is off.
What do I do if I bruise badly one month before the wedding?
Panic usually sets in here, but you have options. If you get a bad bruise from an injection 30 days out, you have time, but you need to act fast to speed up the clearance.
Bruise Management Action Plan
- First 24 hours: Ice intermittently to constrict vessels.
- After 24 hours: Switch to warm compresses to encourage blood flow and clear the stagnant blood.
- Topical: Apply Arnica gel or Vitamin K oxide cream multiple times a day.
- Oral: Bromelain (pineapple enzyme) supplements can help reduce inflammation.
- In-Office Rescue: Call your dermatologist. Many clinics offer a quick zap with a V-Beam or IPL laser. This breaks up the pigment in the bruise and can make it disappear in 24 to 48 hours rather than a week.
Are injectables safe during pregnancy or breastfeeding?
No. It is unethical and unsafe to perform cosmetic injections on pregnant or breastfeeding patients. While local absorption is low, there are no clinical studies proving safety for the fetus or infant because you cannot test on this demographic.
If you find out you are pregnant during your wedding prep, you must cancel your Botox and filler appointments. Switch to pregnancy-safe facials (like oxygen facials) and lymphatic massage to help with puffiness.
How to manage last-minute breakouts or cold sores pre-wedding?
Stress spikes cortisol, and cortisol causes acne and immune suppression (hello, cold sores). This happens to almost everyone.
The Emergency Kit
- Cystic Acne (Deep, painful bump): Do not squeeze it. You will create a scab that makeup cannot hide. Call your dermatologist for a cortisone injection. This flattens the cyst in 24 hours. If you can’t get an appointment, use a high-quality hydrocolloid patch overnight to draw out fluid.
- Whiteheads: Apply a spot treatment with sulfur or salicylic acid.
- Cold Sores: If you are prone to them, ask your doctor for a prescription antiviral (like Valacyclovir) to have on hand. Take it the second you feel the “tingle.” Do not wait for the blister to form.
When should I consult my dermatologist or plastic surgeon for an unexpected reaction?
Most side effects are annoying but harmless. However, there are rare complications that require immediate medical intervention to prevent permanent damage. Do not wait “to see if it gets better” in these scenarios.
Red Flags Requiring Immediate Contact
- Vascular Occlusion (Fillers): If the skin turns white (blanching) or blotchy red/purple in a reticular (net-like) pattern, or if you feel severe pain that is not normal soreness. This means filler has blocked a blood vessel. This is a medical emergency. Go to your injector immediately to have it dissolved.
- Infection: Area is hot to the touch, throbbing, expanding redness, or oozing pus.
- Allergic Reaction: Hives, difficulty breathing, or swelling of the tongue/throat. Go to the ER.
- Herpetic Outbreak: If a laser or peel triggers a massive spread of cold sores across the face, you need antiviral medication instantly to prevent scarring.
Final Takeaways for Safe Pre Wedding Treatments
We have covered the specific procedures and answered the burning questions. Now, we need to put all that information into a rigid, fail-safe mindset. When you are planning a wedding, timing is the only thing that matters as much as the treatment itself. You cannot rush biology. Skin cells take about 28 days to turn over, and collagen production from lasers or microneedling peaks months after the actual appointment.
If you try to cram six months of work into six weeks, you risk inflammation, adverse reactions, and stress that will show up on your face. This action plan prioritizes safety above all else.
The Three Non-Negotiable Safety Rules
Before looking at the calendar, you need to commit to three rules. These are not suggestions. They are the difference between a radiant complexion and a medical emergency on your wedding day.
1. Vetting is Your Second Job
Never choose a provider based on a discount or a Groupon deal. You need a board-certified dermatologist or a plastic surgeon for injectables and lasers. For facials, look for licensed medical estheticians working within a clinical setting. Check their credentials and look for “before and after” photos of patients who have your specific skin type. If a clinic is hesitant to show you their work or discuss risks, walk away.
2. The Timeline Must Be Conservative
Always assume you will be the patient who swells the most or bruises the longest. If a brochure says recovery takes three days, give yourself seven. If a filler is supposed to settle in two weeks, schedule it six weeks out. You want to look like yourself, not a swollen version of yourself. Buffer time is your insurance policy against biology.
3. No New Players in the Final Quarter
The last two months are for maintenance, not experimentation. Do not try a new chemical peel, a new skincare brand, or a new injector within 60 days of the wedding. You do not know how your immune system will react. If you haven’t tested a treatment six months ago, you aren’t doing it now.
Emergency Protocols: Managing Unexpected Reactions
Even with perfect planning, biology is unpredictable. You need a plan B for lingering side effects.
Managing Bruising and Swelling
If you have a bruise from a treatment done a few weeks ago that hasn’t faded, start taking Arnica Montana and Bromelain supplements (with doctor approval). Topical Vitamin K cream can also speed up healing. If the bruise is significant 72 hours before the wedding, call your dermatologist. Many clinics have a vascular laser (like a V-Beam) that can break up the pigment in a bruise and make it disappear within 24 hours. For swelling, sleep elevated on two pillows and avoid hot showers. Have a high-coverage concealer ready that matches your skin tone exactly—ask your makeup artist to teach you how to color-correct (green for redness, peach for blue/purple bruising).
When to Postpone or Pivot
If you develop a cold sore, an infection, or a severe allergic reaction in the final week, you must pivot. A cold sore can be managed with prescription antivirals (Valtrex) if caught early. If you suspect a vascular occlusion (severe pain and whitening of the skin) after fillers, this is a medical emergency requiring immediate dissolving of the filler, regardless of the wedding date. Health comes first.
Communication and Documentation
You are managing a team of vendors, and your medical provider is part of that team. Clear communication prevents disasters.
Talk to Your Vendors
Tell your makeup artist exactly what procedures you have had. Fresh Botox means they shouldn’t rub your forehead aggressively. Fresh filler means they need to be gentle around the lips. If you have had laser treatments, your skin might be more sensitive to certain primers or setting sprays. Be open so they can adjust their products.
Travel and Honeymoon Considerations
If you have had body contouring or laser treatments, your skin is compromised. Sun exposure can cause hyperpigmentation (dark spots) on treated areas. If you are going to a beach destination, pack high-SPF protective clothing and broad-spectrum sunscreen. Avoid hot tubs or saunas if you have had recent injectables, as heat can increase swelling.
Document Everything
Take photos of your face and body every week starting six months out. We often forget what our baseline looked like. These photos help your provider adjust dosages and prove that the treatments are working. Read every informed consent form. They list the rare but real risks. Being informed lowers your anxiety because you know what to expect.
Sources and Clinical References
The recommendations in this timeline are based on safety guidelines and clinical protocols established by major dermatological and plastic surgery associations.
- American Society of Plastic Surgeons (ASPS). (2024). Botulinum Toxin and Soft Tissue Filler Safety Guidelines.
- American Academy of Dermatology (AAD). (2023). Guidelines of Care for the Management of Acne Vulgaris and Post-Inflammatory Hyperpigmentation.
- U.S. Food and Drug Administration (FDA). (2025). Dermal Fillers: Soft Tissue Augmentation and Approved Uses.
- Cohen, J. L., et al. (2022). “Consensus on Timing of Aesthetic Procedures Prior to Major Social Events.” Journal of Drugs in Dermatology.
- Plastic and Reconstructive Surgery Journal. (2021). “Complications in Non-Surgical Facial Rejuvenation: Prevention and Management.”
Sources
- When to Get a Facial Before Wedding Day in Los Angeles – AleuCo — Ideally, a consistent facial regimen should commence at least six months before the wedding. This extended period allows for deeper treatments …
- Wedding Skin Countdown: What Facials to Get and When — Schedule a pre-wedding facial about 6 to 8 weeks before the big day—like a hydrafacial or LED-enhanced session—to boost hydration and skin radiance. You can …
- The Do's and Don'ts of Pre-Wedding Beauty Treatments — “We recommend that a bride start a facial regimen eight to 10 months before the wedding,” celebrity esthetician Joie Tavernise of JTav Clinical …
- A Wedding Beauty Timeline to Help You Feel Your Most Confident — Wondering when you should get a facial or haircut before your wedding? Check out our comprehensive wedding beauty timeline to find out.
- Pre-Wedding Treatment Timeline | Madison, Connecticut — If your wedding preparations include deep facial rejuvenation, nine months out is the perfect time to get these started. This is usually when we recommend …
Legal Disclaimers & Brand Notices
The content provided in this article is for informational purposes only and does not constitute professional medical advice, diagnosis, or treatment. Always seek the advice of a board-certified dermatologist, plastic surgeon, or other qualified health provider with any questions you may have regarding a medical condition or procedure. Never disregard professional medical advice or delay in seeking it because of something you have read in this article.
All product names, logos, and brands mentioned in this text are the property of their respective owners. This includes, but is not limited to, the following trademarks:
- Botox, Dysport, and Daxxify
- HydraFacial
- CoolSculpting
- Fraxel and Clear + Brilliant
All company, product, and service names used in this article are for identification purposes only. Use of these names, logos, and brands does not imply endorsement or affiliation.