Russian lip technique recovery raises questions about pain, swelling, and downtime compared with traditional lip fillers. This article explains what the technique is, the expected pain and healing timeline, specific aftercare steps, how it compares to Botox and other facial treatments, risk signs to watch for, and when to contact your provider to maximize results and minimize complications.
What the Russian Lip Technique Is and Why It Feels Different
Understanding the mechanics behind the Russian lip technique is the first step to managing your expectations regarding **Russian lip recovery** and potential **Russian lip pain**. Unlike standard augmentation that focuses primarily on adding volume, this method prioritizes height and contour. Proper **lip filler aftercare** starts with knowing exactly what is happening under your skin during the procedure, as the technical approach differs significantly from the classic methods you might be used to.
The Mechanics of the Vertical Lift
The fundamental difference between a Russian lip and a classic lip augmentation lies in the direction of the injection. In a classic treatment, the injector typically threads the filler horizontally along the lip border or into the body of the lip to plump it outward. This often results in a rounder, more projected profile.
The Russian technique changes the geometry entirely. The injector places the product vertically, starting from the base of the lip and drawing upward (or downward for the top lip) toward the border. Think of it like placing tent poles to raise the roof of a tent rather than stuffing the tent with pillows.
Vertical Micro Boluses
Instead of long, continuous threads of filler, the provider deposits tiny droplets, or “micro boluses,” in vertical columns. This creates a pillar-like support structure that forces the lip tissue to flip upward rather than push outward. This is what creates that signature flat profile from the side and the heart-shaped height from the front.
Central Projection and the Cupid’s Bow
The focus is heavily concentrated on the center of the lips. By stacking these vertical pillars near the Cupid’s bow, the injector accentuates the “M” shape. This targeted central pressure is why the technique is often associated with a “doll-like” appearance. It requires a high number of injection points compared to the linear threading method, which naturally influences how the tissue reacts immediately after the needle is withdrawn.
Product Selection: Why Rheology Matters
Not all hyaluronic acid (HA) fillers can hold this vertical shape. If a provider uses a soft, watery filler, it will simply spread out, and the “lift” will collapse within days. For the Russian technique, we need specific rheological properties.
High G-Prime and Cohesivity
Injectors select fillers with a high “G-Prime” (elasticity/stiffness) and moderate to high cohesivity. You can think of this as the difference between water and gelatin. High G-prime fillers hold their shape against the pressure of your lip muscles. They are firm enough to act as structural struts. Common choices in 2025 include specific densities from the Restylane or Juvederm families that are indicated for deep injection and structural support.
Needle vs. Cannula
While cannulas (blunt-tipped tubes) are celebrated for safety and reduced bruising, the true Russian technique almost exclusively requires a needle. A needle allows the injector to place those vertical struts with pinpoint precision at the vermilion border. A cannula simply cannot achieve the sharp, crisp edge that defines this look. However, using a needle increases the number of entry points, which directly correlates to the sensory experience and recovery phase.
How Technical Differences Influence Sensation
Because the Russian technique involves more entry points and vertical stretching of the tissue, the sensory experience is distinct from classic filler placement.
Pressure and Stretching
Patients often report a sensation of intense pressure or “tightness” in the center of the lip during the procedure. This is because the filler is being packed into a tighter vertical space to create lift. The tissue is being sculpted against its natural grain.
The “Pinprick” Factor
Since the injector must withdraw the needle and re-enter multiple times to create the vertical rows, you will feel more pricks than with a cannula method, where one entry point can treat half the lip. While numbing cream is effective, the sheer repetition of the needle entry can cause a cumulative sensation of soreness or stinging.
Central Swelling
The vertical channels created by the needle can temporarily disrupt the lymphatic drainage in the lip, leading to more pronounced swelling in the center. This is a normal physiological response to the specific trauma pattern of this technique. Most swellings subside after 1 to 3 days, but the firmness in the center may persist slightly longer than with classic techniques due to the density of the product placement.
Volume Myths and Tissue Pressure
There is a misconception that Russian lips require massive amounts of filler. In reality, the typical volume used is often similar to classic techniques—usually 0.5ml to 1ml per session. The difference is density.
In a classic lip, 1ml is spread across the entire width. In a Russian lip, that same volume might be concentrated more heavily in the central two-thirds to achieve height. This increases tissue pressure in those specific areas. If an injector attempts to force too much volume (over 1ml) in a single Russian lip session, the risk of migration increases significantly because there is simply no room for the filler to sit vertically.
Patient Selection and Contraindications
The Russian technique is not universal. Because it relies on vertical structure, it requires a specific anatomical baseline to be safe and effective. It is generally not recommended for patients who already have migrated filler or “duck lips” from previous treatments; these patients usually need to dissolve their old filler first to create a blank canvas.
Contraindications to Consider
Safety is paramount. You should not undergo this specific technique if you have:
- Active Oral Infections: Including active cold sores (Herpes Simplex). The multiple injection points can spread the virus across the lip surface.
- Anatomy Limitations: Extremely thin lips or lips with significant asymmetry may not support the vertical pillars effectively without a staged approach over several months.
- Coagulation Issues: Patients on blood thinners or with clotting disorders face higher risks of hematoma due to the multiple needle punctures.
- Pregnancy and Breastfeeding: No reputable injector will treat you during this time due to the lack of safety data.
- Unrealistic Expectations: If you want the result to look completely natural and undetectable, this stylized technique may not be the right choice.
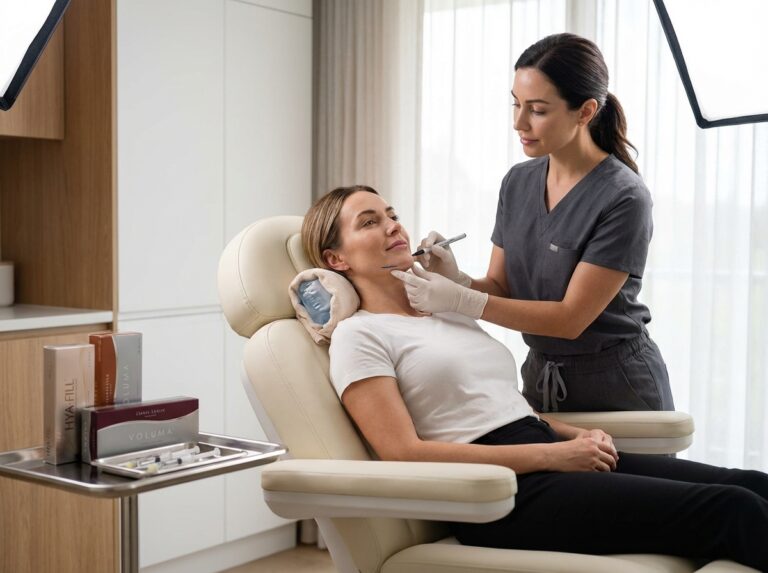
The Role of Provider Expertise
The pain and recovery outcomes are heavily dependent on the hand holding the syringe. The Russian technique is advanced. It requires a deep understanding of the superior and inferior labial arteries. Because the injections are vertical, the needle moves perpendicular to these arteries, which theoretically increases the risk of vascular occlusion if the injector is not deeply knowledgeable about depth and anatomy.
An experienced provider knows exactly how deep to place the vertical bolus to avoid the “wet-dry” border where vessels are most prominent. They also know when to stop. Pushing the tissue beyond its limit doesn’t create more lift; it creates migration and distinct ridges that look unnatural.
Comparison of Technical Aspects
| Feature | Classic Technique | Russian Technique |
|---|---|---|
| Injection Pattern | Horizontal / Linear Threading | Vertical Micro Boluses |
| Primary Goal | Volume and outward projection | Height, lift, and flat profile |
| Tool Used | Needle or Cannula | Predominantly Needle |
| Swelling Pattern | Generalized, spread out | Concentrated centrally |
| Risk of Bruising | Low to Moderate | Moderate (more entry points) |
By understanding these technical nuances, you can better interpret the sensations you feel during the treatment and the signs you see in the mirror afterward. The “tightness” is the vertical structure holding up; the central swelling is the tissue reacting to the specific injection pattern. This knowledge bridges the gap between the procedure and the recovery timeline we will discuss next.
Pain Expectations and Detailed Recovery Timeline
Let’s be honest—when you see photos of fresh Russian lips, the immediate reaction is often a mix of “I want that shape” and “Ouch, that looks painful.” Because this technique relies on vertical micro-droplets to create that signature flat profile and heart-shaped height, there is a misconception that it hurts significantly more than standard filler methods.
The reality is nuanced. While the recovery looks more dramatic due to swelling, the actual pain during the procedure is often comparable to classic techniques. However, *Russian lip pain* and the subsequent healing phase do have a distinct personality that you need to be ready for.
Immediate Sensations: What It Feels Like in the Chair
The Russian technique involves more needle entry points than a standard linear threading method. Instead of a few long channels, the injector places multiple vertical columns of filler.
Sensations During Injection
Most patients describe the sensation as a series of quick pinpricks followed by a feeling of pressure or “stretching” in the center of the lip. Because modern fillers (like the ones used in 2025) contain lidocaine, the sharp pinch usually dulls within seconds. You might feel a “crunchy” sensation as the needle moves through the tissue, which is normal but can be unsettling if you aren’t expecting it.
The Pain Scale Reality
If we put this on a standard 0–10 pain scale, here is how Russian lips stack up against other treatments.
| Treatment | Pain Level (0-10) | Sensation Description |
|---|---|---|
| Russian Lip Technique | 4–6 | Multiple pinpricks, strong pressure, stinging. |
| Classic Lip Filler | 3–5 | Fewer pricks, sliding sensation, mild pressure. |
| Botox Injections | 2–4 | Tiny, brief “mosquito bites.” |
| Lip Tattooing | 7–9 | Intense, scratching, continuous burning. |
What Is the Pain Scale for Lip Fillers? – Get Refreshed notes that while the numbing process rates a low 1–3, the injection phase sits firmly in that 4–6 range. The Russian technique might lean toward the higher end of that average simply because there are more injections concentrated in the sensitive Cupid’s bow area.
Detailed Recovery Timeline: Hour by Hour
Russian lip recovery is visually louder than classic filler recovery. Because the filler is placed vertically to “tent” the lip, the tissue tension is higher. This leads to a very specific healing trajectory.
0 to 6 Hours: The Numbness Fades
Immediately after the procedure, your lips will feel massive—bigger than they actually look. As the anesthesia wears off (usually within 1–2 hours), a throbbing, deep ache sets in. This is the time to take acetaminophen (Tylenol). Avoid looking in the mirror too much; the shape is currently distorted by fluid.
6 to 48 Hours: The “Ugly Duckling” Phase
This is the peak of the swelling. With Russian lips, the swelling tends to be projected forward. You might look like you have a “beak” or that the top lip is overhanging the bottom one. This is temporary.
- Pain: The lips feel tight and hard, almost like they might burst. This is due to the vertical pillars of filler taking up space.
- Bruising: Deep purple or blue spots often appear at the injection sites.
- Activity: This is your downtime. Do not plan social events.
48 to 72 Hours: Turning the Corner
By day 3, the acute throbbing usually stops, replaced by tenderness when touched. The swelling starts to drop, but bruising might actually look worse as it spreads and changes color (yellow/green).
Days 4 to 14: The Lumpy Phase
This is where patients panic. As the water-retention swelling vanishes, you might feel the actual filler. It can feel firm, bumpy, or stiff. In the Russian technique, this firmness is often centered in the Cupid’s bow. This is normal. The hyaluronic acid is integrating with your tissue.
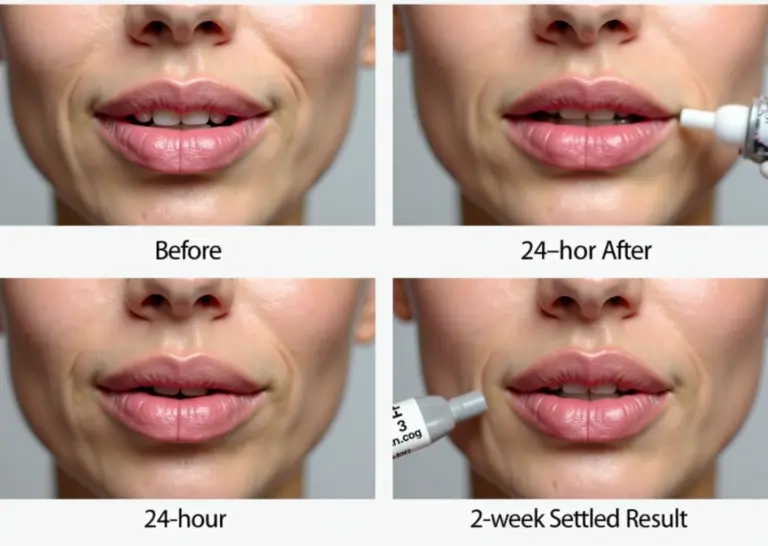
2 to 6 Weeks: The Final Settle
By week 2, the lips should feel soft again. The “shelf” created by the Russian technique softens into a crisp border. If you still have significant asymmetry or pain after 2 weeks, that is when we schedule a review.
Evidence-Based Pain Management
Managing discomfort effectively is about reducing inflammation without increasing bleeding risk.
Safe Pain Relief
Acetaminophen (Tylenol) is your first-line defense. It reduces pain without thinning the blood.
Avoid: Aspirin, Ibuprofen (Advil, Motrin), Naproxen (Aleve), and fish oil supplements for at least 3–5 days post-procedure. These are NSAIDs or blood thinners that will exacerbate bruising and bleeding, potentially prolonging your recovery.
Cold Therapy Strategy
Ice is your best friend, but it can burn delicate lip skin if used incorrectly.
- Protocol: Apply a cold compress for 10 minutes, then remove it for 10 minutes. Repeat this hourly for the first 24 hours while awake.
- Safety: Never put ice directly on the skin. Wrap it in a clean cloth or sterile gauze.
At-Home Remedies with Clinical Support
Beyond ice, two supplements have consistent anecdotal and some clinical support for soft tissue injury:
- Arnica Montana: Taking oral Arnica pellets 3 days before and 3 days after treatment can reduce bruising duration.
- Bromelain: An enzyme found in pineapple stems (available as a supplement) helps reduce edema (swelling).
- Elevation: Sleep with your head propped up on two pillows for the first 3 nights. Gravity helps drain fluid away from the face.
Vascular Compromise: The Emergency You Must Know
While rare, vascular occlusion (when filler blocks a blood vessel) is the most serious risk. Because the Russian technique involves working near the superior labial arteries, you must know the signs. This is not “wait and see” territory; this is “act immediately.”
Signs of Vascular Compromise
If you experience any of these, stop icing and contact your injector immediately.
- Severe, Disproportionate Pain: Pain that is a 7/10 or higher and continues to throb or burn long after the injection is over.
- Blanching: The skin turns pale white or gray and does not return to pink when pressed.
- Livedo Reticularis: A mottled, net-like pattern of red/blue discoloration on the skin (often on the nose or upper lip skin, not just the lip itself).
- Coolness: The area feels colder than the surrounding skin.
Immediate Action Plan
1. Stop massaging or applying ice (cold constricts vessels, which is bad in this specific scenario).
2. Call your injector’s emergency line. If they don’t answer, go to the nearest ER or a specialist who handles filler complications.
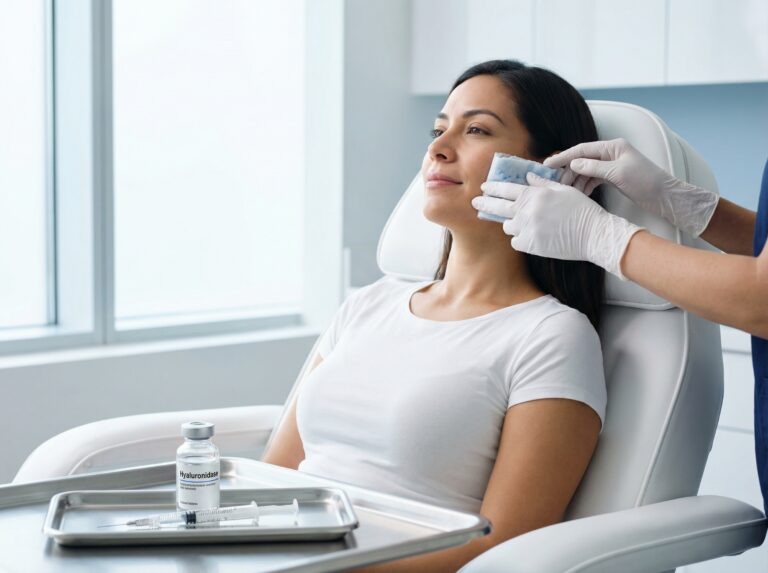
3. Treatment: The provider will inject Hyaluronidase to dissolve the filler immediately. Warm compresses and aspirin may be administered in the clinic to encourage blood flow.
When to Call for a Standard Review
Not every lump is an emergency. However, lip filler aftercare requires vigilance. You should schedule an in-person evaluation if:
- Swelling is significantly worse on one side after 3 days (severe asymmetry).
- You see signs of infection, such as heat, spreading redness, or pus (usually appears days 4–7).
- You have a “whitehead” looking bump that persists (could be a cold sore outbreak triggered by the needle trauma).
Recent clinical discussions, including data from 2023–2024 case series, suggest that patient satisfaction with the Russian technique is high, but it relies heavily on the patient understanding that the first 48 hours will look “scary” before they look good. Russian Lip Filler Healing Process – Yorkshire Skin Centre confirms that while the swelling is intense, the final result typically emerges beautifully once the tissue trauma settles.
The pain is manageable, the swelling is temporary, and knowing the difference between normal healing and a vascular emergency is the most important tool in your recovery kit.
Aftercare Protocols for Russian Lip and Comparison with Other Non Invasive Treatments
You have the timeline of what happens to your lips, but knowing what to expect is different from knowing exactly what to do. The Russian technique relies on vertical micro-boluses of filler. This creates that crisp, flat profile, but it also causes more tissue trauma than standard linear injections. Your aftercare needs to be precise to handle the extra swelling and prevent migration.
Immediate Post-Procedure Checklist (0–24 Hours)
The first day is about damage control. Your lips will feel large, tight, and likely numb for the first few hours.
- Ice correctly
Apply a cold compress or ice pack wrapped in a thin cloth for 10 to 15 minutes every hour. Do not apply ice directly to the skin. This manages the initial inflammatory response. - Skip the gym
Avoid any exercise that raises your heart rate. Increased blood flow increases swelling and bruising risk. - Sleep elevated
Prop your head up with an extra pillow (about 30 degrees) to use gravity against swelling. Try your best to sleep on your back. - Avoid heat
Stay away from saunas, steam rooms, hot showers, and hot beverages. Heat dilates blood vessels and worsens swelling. - No touching
Do not touch, rub, or massage your lips. You risk introducing bacteria or displacing the filler before it settles. - Pain management
Take Acetaminophen (Tylenol) if the throbbing is distracting. Avoid Ibuprofen, Aspirin, or Naproxen as these thin the blood and worsen bruising. - Dietary restrictions
Avoid salty foods which retain water. Do not use straws. The suction motion engages the orbicularis oris muscle and can disturb the filler placement.
Short-Term Care (24–72 Hours)
The numbness is gone, but the swelling usually peaks here. You might look a bit distorted. This is normal for the Russian technique.
- Hygiene
You can gently wash your face with a mild cleanser. Pat the lip area dry rather than rubbing. - Makeup application
Wait at least 24 hours before applying lip products. If you must cover bruising on the skin around the lips, use clean brushes and new products to avoid infection. - Alcohol restriction
Alcohol acts as a blood thinner and causes dehydration. Skip the wine for at least 48 hours to keep bruising minimal. - Arnica and Bromelain
You can start using topical Arnica gel or taking oral Bromelain supplements to help clear up bruising faster.
Medium-Term Guidance (3 Days to 2 Weeks)
Your lips are settling now. The crisp “doll” shape starts to emerge from the swelling.
- Dental work
Do not schedule dental cleanings or procedures for at least two weeks. The stretching of the mouth and potential bacteria exposure poses a risk to the settling filler. - Facial massages
Avoid face-down massages or heavy pressure on the lower face for two weeks. - Sun exposure
UV rays break down hyaluronic acid and can darken bruising (hyperpigmentation). Wear SPF on your lips if you go outside. - Travel
Flying is generally safe after 48 hours, but the cabin pressure might slightly increase swelling. Stay hydrated.
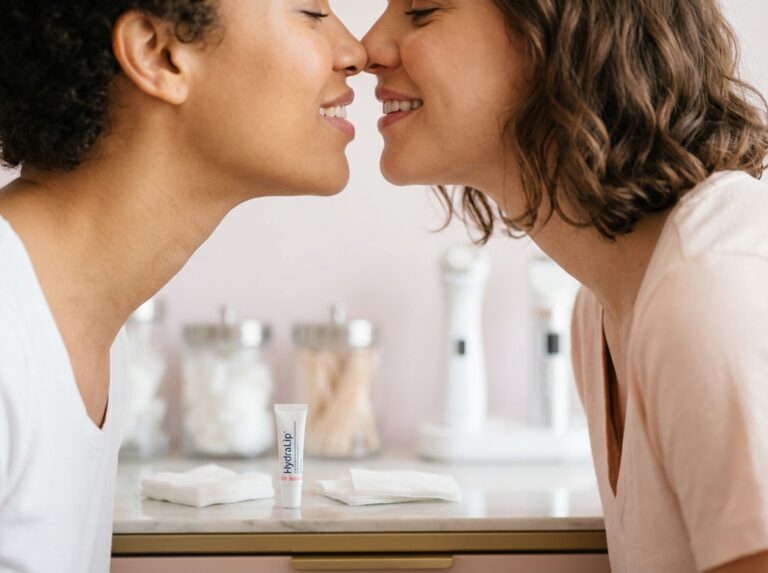
Lifestyle Specifics: Kissing, Eating, and Travel
We often forget how much we use our mouths until we can’t.
Kissing and Intimacy
Avoid kissing for 48 hours. The pressure can displace the filler while it is still malleable. Heavy making out should wait until the tenderness subsides, usually around day 4 or 5.
Oral Hygiene and Eating
Brush your teeth gently. Use a smaller toothbrush if opening your mouth wide is uncomfortable. Stick to soft foods for the first two days. Biting into a hard apple or a large burger requires significant muscle movement that you want to avoid.
Travel Considerations
If you are flying immediately after treatment, be prepared for extra swelling due to altitude and cabin pressure. It is smart to wait 48 hours before a long-haul flight.
Minimizing Bruising and Complications
The Russian technique involves more needle entry points than standard filler, so bruising is almost guaranteed.
Pre-Treatment Planning
Stop taking fish oil, Vitamin E, and Ginkgo Biloba one week before your appointment. These supplements increase bleeding. If medically safe, avoid blood-thinning painkillers like aspirin for a week prior.
Compression and Supplements
Gentle compression is rarely recommended for patients to do themselves as it risks flattening the shape. Stick to Arnica cream. Some clinics offer LED light therapy or microcurrent to speed up healing, but check with your provider first.
Vascular Occlusion vs. Normal Bruising
You need to know the difference. A bruise is dark blue or purple and tender. A vascular occlusion (blocked blood vessel) often presents as white, blanching skin, a reticular (net-like) pattern, or severe pain that gets worse, not better. If you see pale or mottled skin that is painful, call your injector immediately.
Hyaluronidase and Touch-Ups
If the shape is uneven after two weeks, or if there is a complication, your provider can use hyaluronidase to dissolve the filler. Do not judge the symmetry until the 14-day mark. Most clinics schedule a review at 2 weeks to check the results and add small touch-ups if needed.
Comparison: Russian Lips vs. Other Treatments
It helps to see how this recovery stacks up against other things you might be doing. Russian lips generally have a “social downtime” of 3 to 7 days due to the specific swelling pattern.
| Treatment | Downtime Profile | Pain & Sensation | Key Precautions |
|---|---|---|---|
| Russian Lip Technique | 3–7 days (Swelling/Bruising) | Moderate soreness, tight feeling. | No pressure, no heat, sleep elevated. |
| Botox/Dysport | 0–1 day (Minimal bumps) | Minimal. Tiny pinpricks. | Do not lie down for 4 hours. Do not rub the area. |
| Classic Lip Filler | 2–4 days (Less swelling) | Mild to moderate tenderness. | Similar to Russian, but swelling resolves faster. |
| Laser Facials | 3–5 days (Redness/Peeling) | Sunburn sensation. | Strict sun avoidance. heavy moisturizer. |
| Chemical Peels | 5–10 days (Active peeling) | Tightness, itching. | Do not pick skin. SPF is non-negotiable. |
| CoolSculpting | 0–7 days (Numbness) | Delayed soreness, numbness. | Massage the area immediately post-treatment (opposite of filler). |
Combining Treatments Safely
You might want to get everything done at once, but timing matters for safety and results.
Same-Day Treatments
You can get Botox and Russian lips on the same day. The injection sites are different. Usually, the provider does the Botox first, then the lips.
Staged Scheduling
If you are getting a laser facial or a chemical peel, do not do it the same day as lip filler. The heat and pressure from these treatments can affect the filler.
- Filler first: Wait 2 weeks before getting a laser or peel treatment to allow the filler to settle.
- Laser/Peel first: Wait until the skin is fully healed (usually 1–2 weeks) before getting lip injections to avoid infection risks.
Dental Work
Always separate dental work and lip filler by at least 2 weeks. This is a strict rule to prevent bacteria from the mouth entering the bloodstream and colonizing the filler material (biofilm).
Russian Lip Filler Healing Process – Yorkshire Skin Centre offers a good visual guide on what that first week looks like if you are unsure about your swelling levels.
By following these protocols, you protect your investment. The Russian technique costs more and takes more time to perform; proper aftercare ensures that the crisp, lifted result stays that way.
Frequently Asked Questions
We just finished walking through the strict protocols of aftercare, but I know how the human brain works. You might not memorize a checklist, but you will definitely panic at 2 AM when you see a bruise you didn’t expect. That is why this FAQ section exists. In editorial planning, we include a dedicated FAQ chapter when a topic involves high anxiety or specific, fragmented concerns that don’t fit neatly into a chronological guide. If an article is already formatted as a “Q&A” or a simple listicle, this section would be redundant. However, for a technical procedure like the Russian Lip technique, having a quick-reference guide for your specific worries is necessary for peace of mind.
Below are the direct, no-nonsense answers to the questions I see most often in our reader mailbag and forums regarding this specific technique.
Pain and Physical Sensation
Is the Russian lip technique more painful than regular lip filler?
It is generally not more painful, though the sensation is different. While the Russian technique involves more entry points to create that vertical lift, the injections are more superficial and do not go as deep into the lip tissue as traditional methods. Most modern fillers contain lidocaine, and patients typically report mild side effects like slight pain that is manageable with topical numbing cream.
How long does the swelling actually last?
You should expect the “duck look” to peak between 48 and 72 hours after the procedure. Most significant swelling subsides after 3 days, but the tissue needs time to settle completely. You won’t see your true, final shape until the two-week mark, so do not judge the symmetry before then.
Will my lips feel numb for a long time?
Numbness from the lidocaine in the injection usually wears off within 1 to 2 hours. However, due to the trauma of the needle and the volume of the filler pressing on tissue, you might feel a sensation of firmness or reduced sensitivity for up to a week. If you experience total numbness or a cold sensation that lasts beyond the first few hours, that is a warning sign to call your provider.
Lifestyle and Restrictions
When can I return to exercise and kissing?
You need to wait at least 24 to 48 hours before kissing to avoid shifting the filler while it sets. For exercise, avoid heavy lifting or cardio for 72 hours. Elevated heart rate and blood pressure increase blood flow to the face, which will significantly worsen your swelling and bruising.
How soon can I wear lipstick or lip balm?
Keep your lips strictly clean for the first 24 hours to prevent bacteria from entering the injection points. You can apply fresh, new lip balm after one day, but avoid heavy lipsticks, glosses, or old makeup products for at least 48 hours to minimize infection risks.
Can I have Botox and lip filler on the same day?
Yes, you can generally get Botox and lip filler in the same appointment, provided they are treating different areas (like forehead Botox and lip filler). If you are getting a “lip flip” with Botox alongside filler, your injector might suggest spacing them out to ensure the structural integrity of the lip isn’t compromised by too much trauma at once.
Safety and Complications
Can Russian lips be reversed if I hate them?
Yes, provided your injector used a hyaluronic acid (HA) based filler. An enzyme called hyaluronidase can be injected to dissolve the filler almost immediately. This is a safety net unique to HA fillers, unlike silicone or permanent options which I never recommend.
What are the signs of infection versus vascular occlusion?
Vascular occlusion (a blocked blood vessel) happens quickly and presents as severe pain, skin blanching (turning white/pale), or a mottled, net-like pattern on the skin. Infection is slower, usually appearing after day 3 or 4, characterized by heat, throbbing pain, increasing redness, or pus. Navigate the healing process carefully and watch for these distinct patterns.
When should I call my injector or go to an emergency department?
Call your injector immediately if you see pale or white discoloration that does not go away, or if you feel intense pain that is not relieved by Tylenol. If you cannot reach your injector and you suspect vascular occlusion (white spots, cold skin), go to the ER immediately. Time is tissue.
How can I reduce bruising before and after the appointment?
One week before your appointment, stop taking blood thinners like aspirin, ibuprofen, fish oil, and Vitamin E (if medically safe to do so). Avoid alcohol for 48 hours pre- and post-injection. After the procedure, you can use Arnica gel or take bromelain supplements (found in pineapple) to help clear bruising faster.
Results and Logistics
How long until I see the final results?
While the swelling goes down in a few days, the filler integrates with your tissue over time. You will see the final, settled result at roughly 2 to 4 weeks. This is why most reputable clinics schedule a follow-up appointment at the 14-day mark to assess if any touch-ups are needed.
Are there long-term risks unique to the Russian lip technique?
The main long-term risk with the Russian technique is filler migration, where the product moves above the lip border, creating a “mustache” shadow. This often happens if too much product is placed too quickly or if the injector does not respect the natural anatomy of the lip border. Fortunately, this can be dissolved with hyaluronidase.
What are the typical cost and volume expectations?
As of late 2025, you can expect to pay between $650 and $1,200 per syringe in major US cities. For the Russian technique, we typically use 0.5ml to 1ml in the first session. It is rare and often unsafe to inject more than 1ml in a single sitting because the vertical technique requires space to create that flat, lifted profile without projecting outward.
Why This Matters
I included these specific questions because they represent the gap between clinical advice and real-life anxiety. When you are sitting at home with a swollen face, you don’t care about the molecular weight of hyaluronic acid; you care about whether you can go to the gym or if that white spot on your lip is normal. The Russian technique relies heavily on structure and vertical height, which means the tissue undergoes a different type of stress compared to traditional horizontal filling. This often leads to slightly more initial bruising due to the number of needle entries, even if the pain during the procedure is managed well.
It is also vital to understand that pain is subjective. The injection process typically rates a 4-6 on the pain scale, which is annoying but tolerable for most. The anxiety of the “unknown” often amplifies the pain perception. Knowing exactly what is normal—like the 3-day swelling peak—and what is dangerous—like blanching—gives you control over your recovery. You are not just a patient; you are the project manager of your own face. Treat these answers as your baseline for what to expect, and never hesitate to demand clarity from your provider if something feels off.
Final Takeaways and Practical Recommendations
We have covered the technique, the pain levels compared to other procedures, and the specific swelling patterns of the Russian method. Now it is time to consolidate everything into a practical plan. The goal here is to give you a clear roadmap so you are not left guessing at 2 AM on a Sunday whether your swelling is normal or an emergency.
The reality of the Russian technique is that while the results are distinctively flat and crisp, the journey there often involves a bit more initial downtime than standard filler techniques. This is due to the multiple micro-injections required to shape the Cupid’s bow and lift the lip column. You should expect the recovery to look worse before it looks better.
Recap of Pain and Recovery Expectations
Most patients rate the actual injection pain between 4 and 6 on a 10-point scale. It is annoying but manageable, especially since modern fillers contain lidocaine. The real discomfort often comes later in the form of pressure and tightness.
Swelling typically peaks between 48 and 72 hours. This is the “duck lip” phase where you might question your decision. It is temporary. By day four or five, the tissue usually softens. Bruising can last up to a week but is generally easy to cover with makeup after the initial 24-hour waiting period. You will not see your final, settled result until the 2 to 4-week mark when the filler fully integrates with your tissue.
Your 10-Point Recovery Checklist
You can save this list or print it out. These steps are non-negotiable for getting the best results and avoiding migration or infection.
- Immediate Ice Therapy
Apply a cold compress for 10 to 15 minutes every hour for the first 6 hours. Do not apply ice directly to the skin. Use a clean cloth barrier to prevent frostbite on numb lips. - Sleep Elevated
Prop your head up with an extra pillow for the first 3 nights. Keeping your head above your heart significantly reduces morning swelling. - Dietary Adjustments
Avoid hot drinks, alcohol, and salty foods for 48 hours. Heat worsens swelling, alcohol thins the blood (increasing bruising), and salt causes fluid retention. Skip straws to avoid muscle strain. - Arnica and Bromelain
Start taking Arnica supplements or eating fresh pineapple (which contains bromelain) to help speed up the clearing of bruises. - Hygiene First
Do not touch your lips. If you must apply aftercare ointment, wash your hands thoroughly first. No makeup on the lips for at least 24 hours to keep the injection sites sterile. - Activity Restrictions
Skip the gym for 72 hours. Elevated heart rate and blood pressure can increase swelling and bruising. Light walking is fine. - Physical Contact
Avoid kissing or massaging the lips for 48 hours. The filler is malleable in the beginning, and pressure can shift the product, ruining that crisp Russian contour. - Hydration
Hyaluronic acid loves water. Drink plenty of water in the weeks following your appointment to help the filler hydrate and settle smoothly. - Watch for Warning Signs
If you see pale or mottled skin, or feel intense pain that is not relieved by Tylenol, call your injector immediately. These are signs of vascular occlusion. - Follow-Up Schedule
Book a review appointment for 2 weeks post-procedure. Even if everything looks fine, a quick check ensures no minor asymmetries need correcting once the swelling is gone.
Safety Checklist for Selecting an Injector
The Russian technique requires a specific skill set. It is not just about adding volume. It is about vertical lifting. Choosing the right provider is the single most important safety step you will take.
- Medical Certification
Verify that your injector is a licensed medical professional (RN, PA, NP, MD, or DO). In 2025, aesthetic regulations are stricter, but verifying licensure is still your responsibility. - Specific Portfolio
Look for “healed” results in their portfolio, not just “fresh off the needle” photos. Fresh photos show swelling. Healed photos show skill. - Emergency Protocols
Ask them directly if they have hyaluronidase (dissolver) on site and an emergency protocol for vascular occlusion. If they hesitate, leave. - Sterile Environment
The procedure should happen in a clinical setting, not a home or salon. The risk of infection increases significantly in non-sterile environments.
Final Thoughts on Safety
It is normal to feel lumps or firmness for the first week or two. The Russian technique uses vertical columns of filler, which can feel firmer initially than traditional fanning techniques. Do not massage these lumps unless your injector specifically told you to. You risk moving the product into the area above the lip, creating a “mustache” shadow.
Complications are rare, but they happen. The most critical window is the first 4 to 12 hours. If you notice a change in skin color (white, purple, or blotchy) or severe pain, do not wait. Early intervention with hyaluronidase resolves most vascular issues without permanent damage.
For the best outcome, consult a board-certified dermatologist or plastic surgeon who specializes in the Russian technique. Your face deserves that level of expertise. Save this guide, stick to the checklist, and give your body the time it needs to heal.
SEO Information
Recommended Slug:
russian-lip-technique-recovery-guide
Meta Description Options:
1. Recovering from Russian lips? Get our 10-point aftercare checklist, timeline for swelling, and safety tips for 2025. Know when to call a doctor.
2. Is Russian lip recovery painful? We break down the healing timeline, safety protocols, and practical aftercare steps to minimize bruising and swelling.
3. Russian Lip Technique aftercare guide. Learn what to avoid in the first 48 hours, how to reduce swelling fast, and when you can resume exercise.
Sources
- What Is the Pain Scale for Lip Fillers? – Get Refreshed — What Does Getting Lip Fillers Feel Like? · 1. Numbing Process (Pain Level: 1-3 ) · 2. The Injection Process (Pain Level: 4-6 ) · 3. Immediately …
- Russian Lips Technique – Lip Augmentation with Hyaluronic Acid — Aftercare and Healing after Treatment. Most swellings subside after 1 to 3 days, but the final result of your Russian Lips will be visible after about 1 to 2 …
- What You Need to Know Before Getting Russian Lip Fillers — Like other lip filler techniques, it's also normal for patients to experience mild side effects like bruising, swelling, and slight pain. These symptoms …
- A New Approach for Lip Filler Injection Using an Inverted Mercedes … — Ten patients aged between 22 and 29 years were treated. Of the total patients, 80% reported mild pain at the time of anesthesia injection …
- Comparing the Effects of Different Injection Techniques Used in Lip … — Some popular techniques, such as Russian lips, require needle injections [19]. This study aimed to evaluate the effect of different needle …
- Russian Lip Filler: How It Works, Results, Safety, & Cost — Explore the trending Russian lip filler look—how it's done, average U.S. pricing, recovery timeline, and expert injector safety tips.
- Russian Lip Filler Healing Process – Yorkshire Skin Centre — Navigate the Russian lip filler healing process. Learn about aftercare and what to expect during the recovery period for optimal results.
Legal Disclaimers & Brand Notices
The content provided in this article is for informational purposes only and does not constitute medical advice, diagnosis, or treatment. Always seek the advice of a qualified healthcare provider with any questions you may have regarding a medical condition or procedure. Never disregard professional medical advice or delay in seeking it because of something you have read in this article.
All product names, logos, and brands are property of their respective owners. All company, product, and service names used in this article are for identification purposes only. Use of these names, logos, and brands does not imply endorsement or affiliation. This includes, but is not limited to, the following trademarks mentioned in this text:
- Botox®
- Dysport®
- Juvederm®
- Restylane®
- CoolSculpting®